
I have been asked many times how I fix old photos.. Im self
taught with the help of youtube on almost everything to do with photoshop so my
way might not be the "right" way but i have made some good money out
of this. I am not stuck up so if you need help please feel free to ask and im
more than happy to help if I can! Dont be fooled im FAR from a pro at anything
to do with photoshop, youtubes good, but its not THAT good! :)
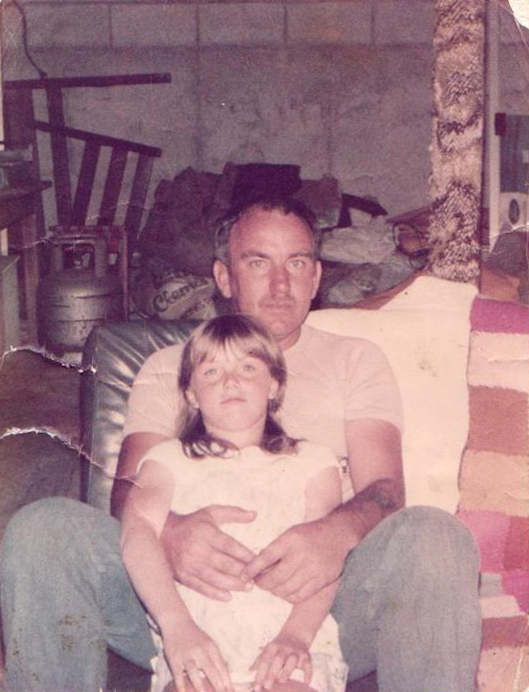
Anyway ill do it with this photo because its an easy fix and
over the next few weeks ill show you how I do harder ones! I will also make
posts for lightroom 3 as well!


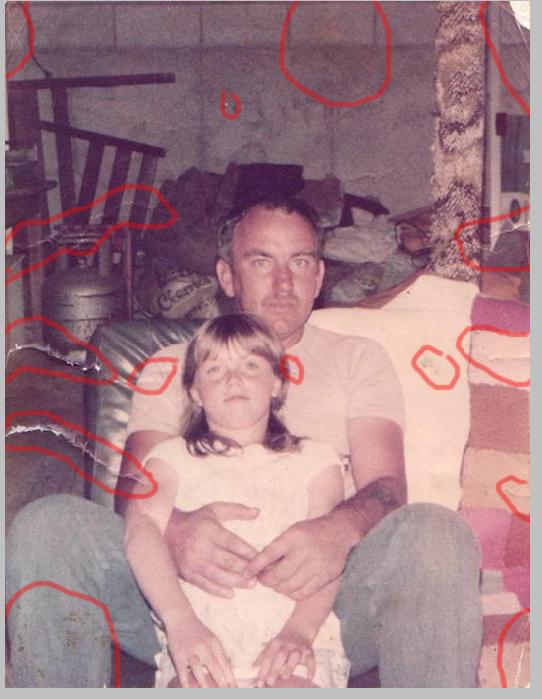
Step 1.... I like to sit and look at the photo ive been asked to
fix for a while. Is there bad marks, dirty spots, off colour? I have marked out
everything on this photo that I would fix. It may be something small but that
something small turns into something big if its the only thing on the photo
that isnt fixed! Once I have worked out everything I want to fix I then fix the
colour of the photo before doing any "fixing"
Step 2
First I ALWAYS duplicate the background layer....... Why?
Because I like to be able to see what ive done and if you make a mistake its
EASY to fix!


RIght click on BACKGROUND , and duplicate layer


You can name this anything you like, I just leave it as
background copy because im blonde and dont want to confuse myself! CLICK OK!
TA DAAAAAA !!! Make sure the duplicate is highlighted. This is
the layer that you will be working with and if anything goes wrong you can just
DELETE it and it will not edit onto your photo:) To toggle this layer on and
off to see your editing simply click the eye in the box next to the layer...
BUT before you start editing again make sure you click it back on! If there is
no eye you will be editing straight onto your photo!

For a quick job this is how I
would edit the colouring in this photo.


On the side panel I select colour
balance, midtones and change to -8, +9, +2


This takes out the Magentaish ( I
just made that word up) of the photo ! Right click the color balance layer and
merge down. This is put that colour change into your duplicate layer but still
NOT on the original photo. With this photo I also took down the brightness -10
and upped contrast 8. Yes yes I know, im crap at editing old photos in colour
but blah HUSH AND LEARN! After changing brightness and contrast I simply merge
down as before!
If you are happy with your photo
so far you can merge your duplicate down ( putting it into the original ) and
make a new duplicate or keep using the same one! I like to merge down so I can
see what ive done with the next part without worrying about the color changes.
Now we get to the fun part!
CLONEEEEEEEEE TOOLLLLL
No im not calling you a tool!
Wellllllllll no im not…. To edit old photos I use 2 main things. Spot healing
and clone. They both work great but for smaller marks use spot healing, always
have your brush a tiny bit bigger than the mark your fixing . On the left hand
panel click on the spot healing brush tool. To adjust the size of your brush
you can use the bracket keys on your keyboard [
] or at the top ( circled in red) and make sure that you have content
aware ticked ( circled in green)

Now work your way around the photo clicking on
any small spots. Do not use spot healing for rips in photos.. This is what I go
after using spot healing brush.


You might not be able to see much
difference but I have cleaned up the jeans, blanket on the couch, behind their heads
and a few minor spots. So now to move onto the clone tool

Lower the opacity to 64% , you may
need to go over the same thing a few times but I have found this easier than
having it at 100% and it looking dicky! The flow I always have around 85% this
is how far from the centre of your brush circle the “cloning” will work.
As with the spot healing brush [
] will change the size of your brush and you want to have it a tiny bit bigger
than the object you want to clone out. Once
the brush is at the correct side hold the ALT key and click as close to the
object as possible without getting in what you want to clone. Try to get much
of the same colours as this is what will be cloned in place! You will have to
keep changing the place you are cloneing from , simply buy holding ALT again to
make sure you don’t repeat.


As you can see I have selected an
area just under this rip to clone from because it is the same colour. When you
move across to the arms, couch etc it will be harder and you may need to try a
few times to get it looking ok… As you can see above my clone stamp the pattern
has repeated, if this happens simply UNDO it. DO NOT CLONE 1 MARK WITH 1 BRUSH
STROKE! ALWAYS select a new area to clone from!

So after going around cloneing
everything I am left with a white patch up the top…. How do we fix that? Same
way! Take a sample clone from under the white spot…. Put your opacity and flow to
100% and clone! For this spot I would sample from the left side of the post
where there is just a plain colour instead of under the white mark because
there is also a few smaller marks there as well .
( for some reason I cant print
screen my brush so I drew it in lol )


This is the end result! I know
its probably not very helpful but I did try to explain it the best I couldL LOL I will make
another one for lightroom 3 later….. Now all you need to do is save!